A bridge at Stirling

#OTD in 1297 the Battle of Stirling Bridge was fought.
The context of the battle was Edward I's invasion of Scotland in 1296, when he deposed John Balliol and took the Scottish royal regalia. There was trouble in the air: an attempted prise of wool from the Scots (55 sacks were seized from Melrose Abbey) and Edward’s efforts to recruit Scottish nobles for his war in France were among the many protests. His treasurer, Hugh Cressingham, screwed money out of the Scots with gruesome efficiency. In May 1297, for example, he sent the sum of over £5,188 south to the Exchequer at Westminster.
Few English lords relished the prospect of service in Scotland, where the harsh climate and lack of rewards made it an unattractive prospect. John de Warenne, Earl of Surrey, had previously quit the office of warden, complaining the weather was bad for his health. Edward looked to Brian Fitz Alan as a replacement, but the Yorkshireman refused.
Surrey grudgingly took up his old job and went back north, where he and Cressingham proved the opposite of a dream team. Cressingham had earlier raised a force in Northumberland, only to be informed by Percy and Clifford they had already pacified the whole of Scotland south of the Forth. Edward’s captains fell to arguing and finally agreed to do nothing. Cressingham complained to the king, who was in Flanders, that “the business has gone to sleep, and each of us has returned to his billet.”
After further delay Surrey and Cressingham finally got themselves into gear and marched from Berwick to Stirling, where Andrew Moray and William Warrace waited on the north side of the Forth. Wallace’s fierce rejection of peace terms failed to ignite any fires in Surrey, who retired to his bed and overslept on the morning of the 11th.
Cressingham, a taxman to his fingertips, was more concerned about the mounting cost of the campaign. Fielding two armies at once, in Flanders and Scotland, placed an intolerable burden on King Edward’s finances. The treasurer knew his master’s difficulties, and wanted the business in Scotland to be done with as soon as possible.
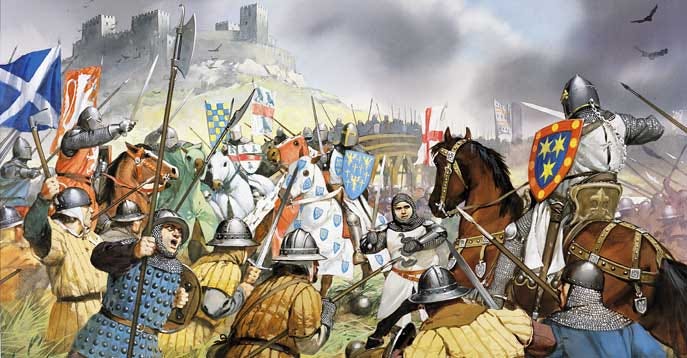
First, a battle had to be fought. Surrey dragged himself out of bed to find that part of his infantry had crossed the bridge over the Forth without waiting for his orders. Annoyed, he called them back again. Cressingham continued to grumble away in the background. Sir Richard Lundy, a Scottish knight who had defected to the English, suggested to Surrey that he take a company of knights further upriver, where there was a ford, and take the Scottish army in flank. Surrey waved him away and ordered his vanguard over the bridge. Cressingham, whom nobody ever accused of cowardice, led them across.
Wallace and Moray’s men poured down from the heights and cut the hapless vanguard to pieces in boggy ground, where they could not deploy. Some three hundred Welshmen were slaughtered, along with an uncertain number of English knights, mostly northerners. One of the survivors, the splendidly named Sir Marmaduke de Thweng, hacked his way through the melee and carried his nephew’s corpse on horseback across the river. He then advised the horror-struck Surrey to demolish the bridge and save what was left of the army.
Surrey gave the order and fled all the way back to Berwick, in such frantic haste he almost killed his horse. Cressingham was killed in the fight and allegedly flayed so Wallace could make a belt of his skin.
In the immediate aftermath of the battle, Wallace’s army (Moray died of his wounds shortly after) swept through southern Scotland and demolished the English administration.
Pic of the battle by Graham Turner.